
Hi everyone! My name is Holly from HollyDolly (@hollydollydarling on Instagram). I was so excited that Kelli asked me to contribute to the Ogden Cami month with a hack tutorial! I’ve made a few different Ogden hacks in the past, including gathered tiered dresses and scalloped edges. But today I thought I would share one of the most simple and popular hacks you can do - easy peasy tie straps! I’m kind of obsessed with adding adjustable ties straps on everything these days, so this is a perfect hack for me to show you.
Now, if you follow me on Instagram, you may know that my “thing” is making matching mommy-and-me-looks for me and my 4 year old, Penny. So seeing that there is also a mini Ogden cami pattern, of course I had to include both! I’ll be showing you the ties straps done on both the adult and mini pattern.

FABRIC
The Ogden works in so many different different fabric choices, from cotton to silk, drapey to stable. I find that the mini Ogden works best in something with just a tiny bit of structure that's easy to work with, like a shirting cotton or quilting cotton. Also remember - your fabric choice will reflect how the bows of your tie straps lay. Drape fabrics will produce drapey bows, while a quilting cotton or something similar will create a bow that stands up more.
For our camis, I went with one of the latest Warp and Weft cottons, which I got from Topstitch ATL.

YARDAGE
Because this is such a simple hack, you shouldn’t need any extra yardage for the ties other than what is listed on the Ogden/mini Ogden instructions.
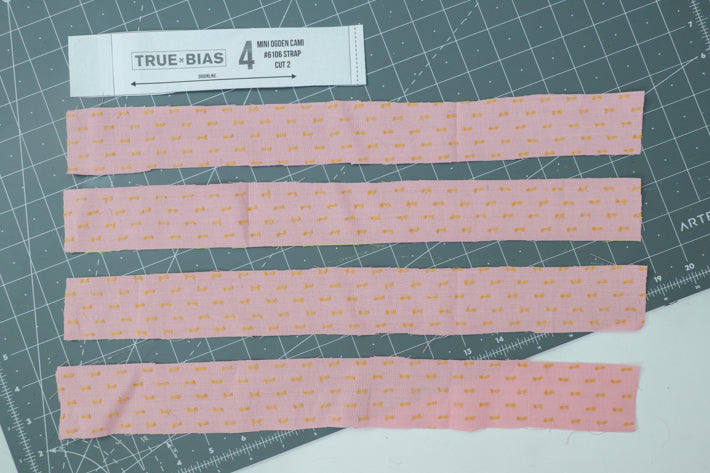
Ok, so let’s get started making the ties straps. You will need to cut 4 straps instead of two, all of which are at least double the length of the strap pattern.
For the mini Ogden, as you can see above, I made the length exactly twice the length as the pattern. But for my adult version, as you’ll see in the final product below, I made my ties extra long. A little over 3 times the length of the pattern. There's no rule to exactly how long your ties have to be - it’s up to you. As long as it is at least twice the length of the pattern, and you cut 4.

Sew the 4 straps exactly as described in the instructions. Use a loop turner to turn them right side out, and press.
Then, on each of the 4 straps, turn under one end twice, and press.
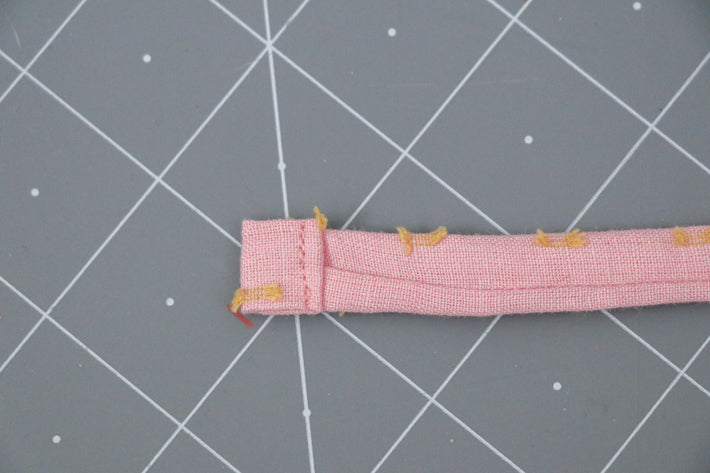
Stitch across the turned under edge, close to edge, to close. Repeat for each of the 4 straps.

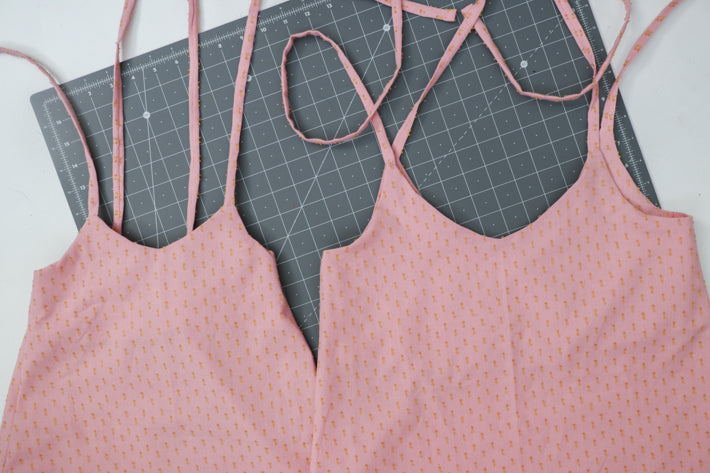
Continue sewing the rest of your Ogden cami exactly as instructed. The only difference - you’ll be placing all four straps in place, front and back, before sewing the facing on. No need to leave openings when sewing around the back facing to add the back straps - they’ll already be in place. You can just sew the facing all at once!

Same goes for the mini. Place the two straps on the front before sewing the facing on. And then two straps on the back. Just remember that the straps on the back go on the wrong side of the fabric, just as directed in the instructions.

That’s it! Once you’ve finished up the facing and hem, you can just tie your straps and they are ready to wear!

Of course, the best thing about this hack is being able to adjust the straps as needed. No need to try and get the tie length perfect during construction. You can adjust the length depending on if you are wearing the cam alone, or over top a tee underneath. It also works well for nursing mamas!


I love how the mini Ogden still has the same look as the adult cami in the front, but with the difference of the straight, elastic back. I think this makes it a lot more comfortable for her, and could also extend its wear, since she grows so fast!

I also love the extra long straps that I did on mine, just because I love that detail. I love long ties! But I think the shorter length is perfect on hers (not as extra long like on mine), that way she isn’t accidentally pulling on them and untying them! It’s such a cute detail on the mini.
And if you’re wondering - yes, she actually does love matching me. For now, anyway, haha. I know one day she won’t think it’s cool anymore, So I take full advantage of it now!

I mean, just look how happy and cute she looks in her new top!

Thank you all for following along, I hope you enjoyed this hack! And thank you to Kelli for having me here on her blog! Don’t forget that you can follow along with me over at @hollydollydarling. I’m sure I’ll be sharing more Ogden versions in the future.