Hi Everyone! Angelica here over at Angelica Creates (@angelica_creates on the ‘gram) and I’m so excited to be on the True Bias blog this week to share my Ogden Cami with a ruffle neckline! I was so thrilled when Kelli approached me to create a tutorial/hack for the Ogden Cami as it has been on my list to sew for a while.
While doing my usual browsing through Pinterest for style inspiration, I discovered ruffle neckline camisoles. I thought they were super cute and that the style would be an easy and simple hack for the Ogden Cami pattern, so that became my inspiration for this project.


Making my ruffle neckline Ogden Cami was so fun! I made it with a silk charmeuse from Fabrics & Fabrics. It’s important for my camisoles to be light and airy. I typically wear them with a blazer or cardigan, so silk was the perfect choice for me.
If you want to make your own Ogden Cami with a ruffle neckline, you can follow my process below!
Fabric Recommendation
When choosing fabric for this hack, I recommend a lighter fabric so that the ruffle doesn’t look too bulky. I also recommend buying an extra ¼ yard of fabric.
Measuring Out the Ruffle
Length
In testing a few different options, I found that using a straight strip of fabric is the easiest and most efficient way to create the ruffle. I tested my idea out by making a muslin and was pleased with how it turned out!

I also wanted to make sure I provided everyone with a method to work with every size. It takes a bit of math, but below is how I calculated the length of fabric for the ruffle:

After my calculation, the length came out to roughly 40 inches total, +/- ¼ inch or so. I rounded to 40 inches for both the front and back since it would be gathered anyway. You can always make your fabric strip longer if you want a more dramatic ruffle! I kept mine fairly minimal.
Width
I wanted a thin and minimal ruffle, so I opted for a width of ¾ in. I also added a ½ inch allowance on both long sides for a total of 1 ¾ in. Of course, if you want your ruffle to be even thinner or thicker you can measure out whatever works best for you!

When cutting my fabric, I used a 20 inch strip of paper as my pattern piece and cut on the fold to total 40 inches.
Sewing the Ruffle to the Camisole

At Step 2:
After preparing my straps, I also prepared my ruffle at step 2.
Finish one long edge of each fabric strip by pressing the raw edge up ¼ inch, then press up again by another ¼ inch. Sew as close to the folded edge as possible, creating a narrow hem.

At this point, sew 2-3 rows of gathering stitches. With right sides together, pin the ruffle pieces to the front and back cami, gathering along the neckline and armhole. I distributed most of the gathers along the neckline and at the top of the armhole. I reduced the amount of gathers around the strap and underarm areas.

Baste the ruffle to the front/back cami.
At Step 3:
Pin and baste the strap to the front cami as instructed. Move the ruffle fabric away from the strap edge so it doesn’t get caught while basting the strap.


The straps and ruffle should now be basted to the front and back cami. Press the ruffle up away from the front/back cami, pressing the seam allowance towards the ruffle.
At Step 4:
Follow the instructions for sewing the side seams but don’t sew across the ruffle neckline seam. This ensures that the neckline seam is not sewn down to the cami. The seam needs to be free since the ruffle will be flipped back down towards the cami in preparation for sewing the lining. Instead, sew right up to the edge of the seam and backstitch to secure your stitches.

Flip the ruffle back down towards the cami with right sides together.
Note: I realized after the fact that another (probably better) option is to sew the fabric strips together in a circle with the short edges together, then attach to the front/back cami – similar to attaching the lining. This method would avoid having to start/stop sewing at the neckline seam.
At Steps 6 and 7:
Follow the instructions for sewing the lining, but be extra careful with the ruffles so that they don’t get caught in the process. It helps to pin them out of the way.
The straps should be behind the ruffle when you turn the cami right side out.
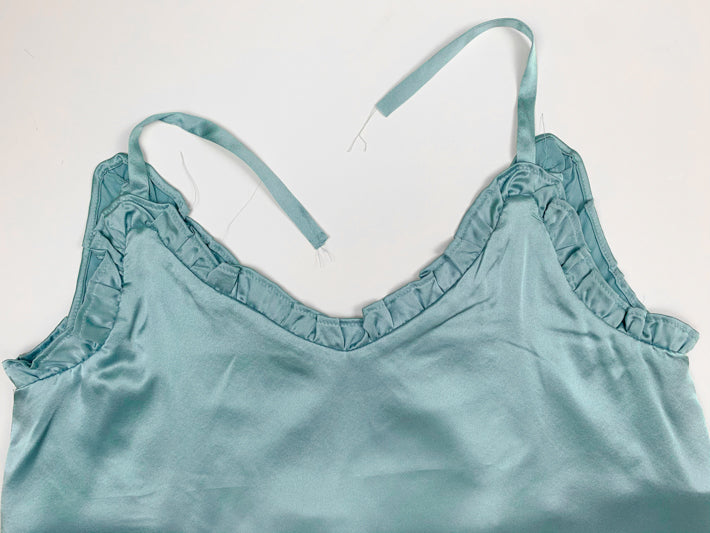
At Steps 9 and 10:
When sewing the straps to the back cami, make sure that the strap will be behind the back ruffle when the cami is turned right side out. This is what it should look like:

At Step 11:
Turn the cami right side out and press. Instead of understitching the lining, top stitch along the neckline and armhole. This provides a bit more structure so the ruffle will stand up and not flop back down.

Follow the rest of the pattern instructions to finish your camisole, then give it a final press! You should now have a lovely Ogden Cami with a cute ruffle neckline!

I hope you enjoyed this pattern hack tutorial. It was so fun creating this version and I’m so excited to see how everyone’s versions turn out!