I started this blog almost a year ago, so I thought that it would be fun to end the year doing something fun with some of the bloggers who have meant a lot to me over the last year. All of these ladies are amazing at what they do and inspire me.
What we did is we all made enough ornaments for all participating (nine in total). The ornaments had to be handmade and we are all posting our tutorials today. Then we send out the ornaments to one another so each get eight beautiful, handmade ornaments over the next few weeks. Fun right?
Here are all of the ladies participating (make sure to go and check out their tutorials today as well):
Sonja of http://gingermakes.wordpress.
Mika of http://savorystitches.
Suzanne of http://mybeaubaby.blogspot.
Miranda of http://www.
Megan of http://blog.megannielsen.com/
Jen of http://grainlinestudio.com/
Dixie of http://dixiediy.blogspot.com/
Madalynne of http://www.madalynne.com
Tutorial for my handmade peacoat ornament:
materials:
-square of felt
-matching thread
-sewing machine
-scissors
-handsewing needle
-black thread
-black seed beads
-fabric glue
-small piece of lining fabric
-copper wire
-pliers
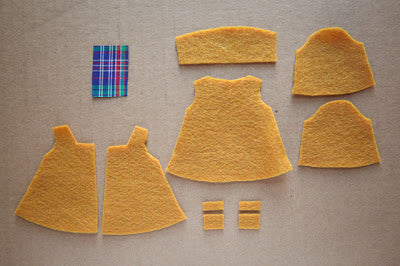
-pattern (click on the pattern photo below to enlarge and print it)
Step 1
Cut out your pattern.
Step 2
With right sides together sew shoulder seams.
*all seam allowances are 1/16″
Step 3
With right sides together sew the tops of the sleeve to the arm hole.
Step 4
With right sides together sew the sleeve and side seams up from wrist to hem.
Step5
Turn right side out and iron flat with steam.
Step 6
Tack the straight side of the collar piece to the back neck of the coat. (either by machine or hand stitch)
Step 7
Create collar by folding down the back over the seam, and bringing the top corners of the collar down to meet the angles of the pea coat. Use fabric glue to tack in place. (this may take a little working until it lays right)
Step 8
Take your lining fabric, fold down 1/4″ and press. Open coat and glue into the inside so that it covers the neck seam.
Step 9
Glue on pocket pieces.
Step 10
Using thread and needle, sew on “buttons” (seed beads) on pockets and six to breast of coat.
Step11
Using pliers, form copper wire into a small hanger using my guide provided (or just make it up as you go:) Insert into coat and glue coat shut.
35 Comments
Oh my gosh!! These are so freaking adorable!! Really great job! I can’t wait to see what the other ladies came up with! Now I just need to actually do the Christmas thing and get a tree…
I love it! I looooove making ornaments, I made fabric ornaments every year for all my friends and family. This year I made fabric origami butterflies. Here’s a post with this year’s and all the previous years ornaments if you want to see 🙂
http://www.nikki-fancythat.blogspot.com/2012/11/ornaments.html
HOLY FREAKIN’ COW! These are too, too sweet! I absolutely love them!
So pleased to have found you via Jen’s blog. What an absolutely sweet idea to have people share some ornament ideas. And your mini coat hanger alone is worth making.
Looking forward to reading more.
x Elena @ Randomly Happy
I love this! (And a coat sew along I can do!)
what a merry morning this has been, seeing all this crafty goodness!! your coat is fantastic. i hope we get a shot of all the ornaments together when they’ve reached their home… 🙂
Kelli, that’s pretty much the cutest thing I’ve ever seen!
ohmygod, that’s crazy cute! I love it!!
your’s, by far, is the best! Holy crap!
So very cute. the little plaid lining kills me!
These are soooo cute!! I love them.
Tooooooo cute! And so sweetly and perfectly made! Man, I’d have a whole little section of wall dedicated to these all year round… Love them!
Kelli I’m dying – this is so adorable!!!
Oh my gosh, these little pea coats are so cool! I’m going to make one. Love it!
hahaha this is awesome. What a cute little coat, thanks for sharing the pattern too!
Oh. My. Goodness!
adorable!!! so clever. Another thing to add to the to-do list. 😀
Hi Kelli, thanks again for the tutorial and pattern. I just blogged about the ten I’ve made! Hope you like them. 🙂
http://sewmm.blogspot.com.au/2012/12/christmas-gifts-peacoat-ornaments.html
oh my word. you made tiny peacoats?! could that be any cuter!!! can’t wait to get mine!!
Thanks for organizing such a fun exchange Kelli!!
hugs! xoxo
Oh my goodness, I saw the little pieces and thought, “ooh, just like a real sewing pattern in miniature” and then you proceeded to actually sew (and line!) it. Very, very cute, and brings a smile to my face.
This is literally BEYOND cute, I can’t believe you made a tiny peacoat!!!! I actually have one almost identical to the mustard one too, haha! I can’t wait to hang this on my tree, and then after christmas hang it in my studio. You sewed in tiny sleeves! DUDE!!!!! Yes!
LOVE IT!! Now all the little animals will have little coats to keep them warm!
WHHHHAAT?!?! I LOVE these! LOVE love love! I definitely am going to make me some wee little coats, this is genius. I have a tradition of making some handmade ornaments every year, and this is perfect!
aww, i love this! and i think i already know a friend that I want to make this for.
If your ornament goes missing just know that you have made one stylish elf very happy. Love them.
Oh my gosh! Your ornament is so adorable! Amazing!
It’s so amazing.
I just adore these little peacoats and wanted to thank you for sharing the tutorial. I made a couple and I think they came out pretty cute (although, I seem to struggle with sewing so tiny around the armholes..and, for some reason the pattern prints out with some lines missing). These little coats remind me of a childhood show I used to watch where there was a mouse puppet and moms of the viewing kids would sew cute little clothes for him, including jackets & the host would show them to the t.v. audience…always loved that part. 🙂
adorable !… je le verrais bien sur une page de scrapbooking… et j’ai même envie de le réaliser dans un vinyl fin, pour en faire un ciré… merci pour le partage !… je cherche des freebies sur le web, mais je recherche aussi des créations “faciles” : mon but est de permettre aux gens qui n’ont pas beaucoup d’argent, ou qui débutent le bricolage, de créer des choses simples, ne demandant pas d’outils “exceptionnels” ni trop de matériel… …./… lorsque je trouve des choses qui me plaisent, je partage mes “bonnes adresses” : la vôtre y sera !… http://pinterest.com/lemondedis/ (j’ai déjà plus de 12000 liens vers des téléchargements gratuits et quelques autres milliers vers des projets de création !)
I just love this idea! So cute. In place of holiday gifts for each other this year, my family is donating new coats to kids in need…but I still wanted to make a little gift to wrap and give to everyone. I’m making these as mementos!
Love this idea and thank you for sharing it with the world.
[…] [TUTORIAL: winter coat tree ornament by True Bias] […]
OMG I just found this today. Too stinkin cute. Making it now!
[…] ornament / Grainline Studio // 3 Voyages of the Creative Variety // 4 handmade peacoat ornament / True Bias // 5 3D felt balls / The […]
I made 2 of this coats with your patterns , I embroidered the front with branches, flowers , leaves and a tiny birds, they are so precious!
Thank you so much for sharing your knowledge